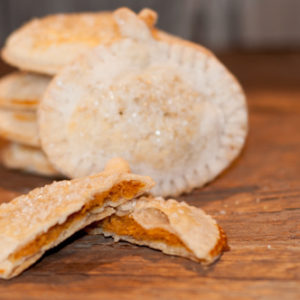
Easy Pumpkin Hand Pies (Mini Pumpkin Pie Treats with Pillsbury Pie Crusts)
As an Amazon Associate and member of other affiliate programs, we earn from qualifying purchases.
If fall had a flavor, it would be pumpkin. And if fall had a smell, it’d be these Pumpkin Hand Pies baking in your oven. They’re everything you love about pumpkin pie but in a portable, poppable version – no forks, no plates, just pure cozy fall goodness. Whether you’re hosting a fall party, packing school lunches, or want something sweet for your afternoon snack, these Pumpkin Hand Pies are the answer.
Gather Your Ingredients
You don’t need anything fancy here – just a few pantry staples and a couple of boxes of pie crust. That’s what makes this recipe so great: it’s easy, quick, and foolproof. Here’s what you’ll need:
- 2 boxes of Pillsbury Pie Crusts – These save time and always bake up flaky and golden brown.
But if you’re a “homemade crust or bust” kind of baker, you can totally use your own pie dough!
Try my homemade pie crust recipe—a perfectly flaky, delicious one for all your pies. - 1 cup canned pumpkin pie mix – Be sure it’s the pie mix, not just pure pumpkin. The mix already has the perfect balance of spices and sweetness.
- 1/2 cup sweetened condensed milk – This adds creaminess and helps thicken the filling just right.
- 1 egg – For richness in the filling.
- 1/3 cup flour – Helps the filling set up inside your little pies.
- 1 egg white – This will be your secret weapon for sealing and brushing the tops.
- Sugar for sprinkling – Because everything’s better with a little sweet sparkle on top.
These ingredients come together to make a batch of roughly 2 1/2 dozen Pumpkin Hand Pies, depending on the size of your cookie cutter. If you’re using a pumpkin-shaped one (which I highly recommend – it’s festive and adorable), you’ll get around 60 cutouts total for 30 pies.
Let’s Make Pumpkin Hand Pies
This recipe looks impressive, but I promise – it’s as easy as pie. See what I did there!!
- Mix the filling:
In a medium bowl, combine the pumpkin pie mix, sweetened condensed milk, whole egg, and flour. Stir until it’s smooth and well blended. It should look like a thick, creamy pumpkin pie filling. - Prepare your crusts:
Roll out the Pillsbury Pie Crusts on a lightly floured surface. Use your pumpkin cookie cutter (or any shape you like) to cut out about 60 pieces total – 30 tops and 30 bottoms.
The ideal cookie-cutter size is around 3 to 31/2 inches wide. That gives you just enough space for a spoonful of filling while keeping them perfectly hand-held. If your cutter is smaller, you’ll end up with more pies but a little less filling per bit. If it’s larger, you’ll get fewer but fuller pies – and honestly, that’s never a bad thing. - Assemble the pies:
Line half of the cutouts on a parchment-lined cookie sheet. Add about a tablespoon of the pumpkin mixture to the center of each one. Don’t overfill – the goal is a nice bite of pumpkin filling, not an eruption in your oven. - Seal them up:
Lightly dab the edges of each filled cutour with egg white. Place a second crust cutout on top and press the edges gently with your fingers. Then us a fork to crimp around the edges. Using a sharp knife make a tiny slit in the top crust to allow steam to escape. - Brush and sprinkle:
Brush the tops with a light coat of egg white and sprinkle with sugar for a little extra crunch and shine. - Bake
Place in a preheated 350º oven for 20-25 minutes, keeping an eye on them so they don’t puff too much. When they’re golden brown and slightly crisp at the edges, they’re ready
Let them cool for a few minutes before removing from the pan!
Tips, Tricks, and FAQ’s
Tip 1: Keep your pie crust cold.
Warm dough is the enemy of flaky crust. If it starts to get too soft while you’re cutting shapes, just pop it back in the fridge for a few minutes.
Tip 2: Seal those edges tight.
Pumpkin filling loves to sneak out in the oven. Make sure you get a good crimp with your fork and don’t overfill.
Tip 3: Use parchment paper.
Not only does this help with cleanup, but it also kepps your hand pies from sticking or getting too brown on the bottom.
Tip 4: Add a little flair.
You can drizzle the tops with a simple powdered sugar glaze after baking, dust with cinnamon sugar, top with whipped cream, and even add a few festive fall sprinkles when serving.
FAQ: Can I make these ahead of time?
Absolutely! You can make the filling a day ahead and keep it in the fridge until you’re ready to bake. Or bake the pies thoroughly, and store them in an airtight container. Like a warm pie, reheat in a low oven (around 300º) for a few minutes before serving.
FAQ: Can I freeze Pumpkin Hand Pies?
Yes – and they freeze beautifully. Just make sure they are fully cooled and in an airtight container.
FAQ: What size cookie cutter works best?
Anything around 3-4 inches wide is perfect. You want them small enough to be held, but big enough to hold a spoonful of filling. I used a pumpkin shape, but a circle tastes just as delicious!
FAQ: Can I make these with homemade pie crust?
Yes! If you love making pie crust from scratch, these hand pies are a great way to show it off. My Great Grandmother’s Lard Pie Crust Recipe works perfectly for this!
Why You’ll Love This Recipe
Pumpkin Hand Pies are everything fall should be – cozy, sweet, and shareable. They’re perfect for the Thanksgiving dessert table, classroom treats, or a bake sale. They travel well, taste incredible, and look like you spent all day making them (even though you didn’t).
Pumpkin Hand Pies (Mini Pumpkin Pie Treats with Pillsbury pie Crusts)
Ingredients
- 2 boxes Pillsbury Pie Crust
- 1 cup canned pumpkin pie mix
- 1/2 cup sweetened condensed milk
- 1 egg
- 1/3 cup flour
- 1 egg white
- Sugar for sprinkling
Instructions
- Preheat oven to 350℉. Line cookie sheets with parchment paper.
- Make the filling: In a medium bowl, combine pumpkin pie mix, sweetened condensed milk, egg, and flour. Stir until smooth and creamy.
- Prepare crusts: Roll out Pillsbury Pie Crusts on a lightly floured surface. use a pumpkin-shaped (or round) cookie cutter about 3-3½ inches wide to cut out approximately 60 pieces total (30 bottoms and 30 tops). You may have to re-roll the extra pie dough after cutting the first batch.
- Assemble: Place half of the cutouts on the baking sheets. Add about 1 Tablespoon of pumpkin filling to the center of each cutout.
- Seal: Brush edges with egg white, top with another crust cutout, and press edges gently to seal. Crimp all the way around with a fork and use a small sharp knife to make a tiny slit in the top for steam to escape.
- Brush and sugar: Brush the tops with egg white and sprinkle with sugar.
- Bake: Bake for 20-25 minutes or until golden brown and slightly crisp around the edges.
- Cool and enjoy: Let cool for a few minutes before removing from the pan. Serve warm or at room temperature.
Notes
- Homemade crust option: These hand pies work beautifully with homemade dough, too! Try my Homemade Pie Crust Recipe for a buttery, flaky alternative.
- Cookiecutter size: Around 3–3½ inches wide gives the perfect balance of crust and filling. Smaller cutters make more pies; larger ones give you fewer but heartier treats.
- Don’t overfill: A heaping tablespoon of filling is plenty — too much can cause leaks while baking.
- Keep crust cold: Cold dough bakes up flaky and golden. If it starts to soften, chill for a few minutes before baking.
- Freezing: Let baked hand pies cool completely, then freeze in airtight containers. Reheat at 325°F for 10–12 minutes.
- Make ahead: You can prepare the filling a day ahead and refrigerate until ready to assemble.
Nutrition
Nutrition values are estimates, for exact values consult a nutritionist.
Hey, I’m Jent!
Farmwife Feeds is my little space to share farm life and home-cooked recipes, from my soul to yours. These are the recipes I cook that my family eats. And while you’re here, stay awhile and see some of the farm. I share what’s real, muddy boots and all, so what you see is what you get. Read more…
No tailgate would be complete with out the perfect drink! The Farmwife Drinks has us covered with these two recipes!